Posts

Showing posts from February, 2016

Birdhouse

Image
Good Morning Crafters   How are you all? Did you have a good weekend.   Well a leap year this year so the last day of February today, were have these 2 months gone?   A beautiful step by step tutorial by Samantha to share.   Products used are from the Personal Impressions website.   For this project you will need the following:   Birdhouse, Marianne Design Collectables. COL1308. My Botanic Garden Pad, Studio Light. PPMBG20. Craft UK LTD C6 white card, 250gsm PI Smooth White Card. Sweet Dixie Dies  SDD102 Delicate Blossoms. Viva Inka Gold. Oaktree 4mm pearls. Vintage Photo and Peeled Paint Distress Ink. Viva Inka Gold. String   Step 1   Cut a piece of decorative paper from the pad to fit the C6 card, ink around the edges with Distress ink. Cut a mat from the green paper and distress the edges with a tool. Colour the leaves cut with the Sweet Dixie Dies.   Step 2   Die cut the birdh

Sweet Dixie Floral Card

Image
Good Morning Crafters   Today we have a beautiful floral card tutorial by Samantha who has used Sweet Dixie dies designed by Sue Dix.   Check out the Stockist Locator on the Personal Impressions home page for a stockist of Sweet Dixie dies near you!   For this project you will need the following:   Sweet Dixie Dies  SDD096 Elegant Borders. SDD102 Delicate Blossoms. SDD105 Someone Special. My Colours card stock. Snowbound, Sweetie Pie and Slate Eleganza Craft Stickers, Pearls silver no.24 Pearls white no.01 Diamante/Pearl Wave x 5 strips. Pink ribbon   Step 1   Die cut the flowers and leaves, To a special friend, words and the large border and shape the flowers with a ball tool on a foam mat.   Step 2   Layer the white words on top of the grey to give a shadow effect. Colour the leaves green   Step 3   Arrange the flowers and leaves then glue them together. Add a pearl and diamantes to

Easel-ily Shabby Chic

Image
Good Morning Crafters   Today we are sharing a beautiful step by step easel card by Tracey.   Products used can be found on the Personal Impressions website. Check out the Stockist Locator on the home page for a stockist near you!   Pull up a chair and grab a cup of coffee for this in depth step by step! Items you will need for the following: EASYSC380 – Studio light Shabby Chic easy die cut decoupage sheet PPJBS17 Janneke Brinkman –Salentijin Quality Papers 6” x 6” Pad White Smooth Personal Impressions Card Stock    Eleganza Adhesive backed sparkly gems  From my stash Nylon Lace Wooden Embellishments Dies for layering shapes 3d Foam sticky pads Stampin Up Punch – Trio of flowers Step one is to get all the lovely elements together ready for the project and here they are.   Too start with I have popped all the elements for the decoupage out of the sheet and trimmed any bits off the edges and st

Baby Door Hanger

Image
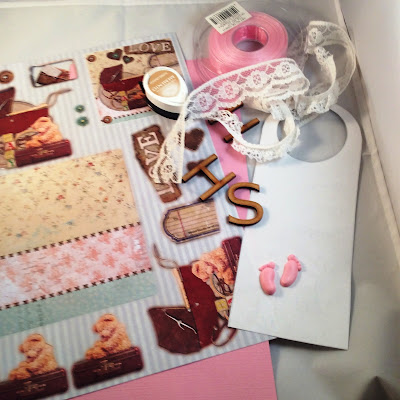
Good Morning Crafters   Just back home following the Trade Show at the NEC in Birmingham.   It was lovely to see you all and make new friends too!   Today we have a beautiful  baby door hanger by our Gill.   Products she has used can be found on the Personal Impressions website.   The items I used for this Door hanger are Vintage Lane 3D Die Cut Block Pad Memento Ink - Toffee Crunch My Colors Cardstock - Sweetie Pie Pink Pink Organza Ribbon MDF Letters Lace from my stock Free Template downloaded from the Internet Little icing feet embellishments from my stash   Step 1 Draw around the template on to you cardstock and cut out   Step 2   Using ultra sticky double sided tape add layers of lace to the bottom of the door hanger Gently ink around the edges with the Toffee Crunch to give a vintage look to the door hanger Step 3 Pop out the decoupage images and put together with d

Ice Princess

Image
Good Morning Crafters   How are you all doing today?   A beautiful card from our Mags today using Little Darlings stamp.   Check out the Personal Impressions website to see the range of Little Darling stamps.   For this project you will need the following: Little Darlings Rubber Stamp ‘Ice Princess’ My colours cardstock in Classic Blue Personal Impressions Smooth White Card Crafty Impressions Light Blue Chiffon Flower Pearl Crafty Impressions Crystal Stickers C6 white card blank – Craft UK Ltd Silver Organza ribbon Silver Alphabet Peel Offs Memento Ink in Tuxedo Black   Step 1 Stamp the image onto the white card using memento ink.  Colour in the image using coloured pens and cut out.   Step 2 Prepare your background card by cutting a piece of blue card to fit your card blank.  Cut a slightly smaller piece of white card and emboss using an embossing folder.  Stick the white embossed card onto the blue card.