Posts

Showing posts from March, 2016

New Sweet Dixie Stamps designed by Kathryn Halstead

Image
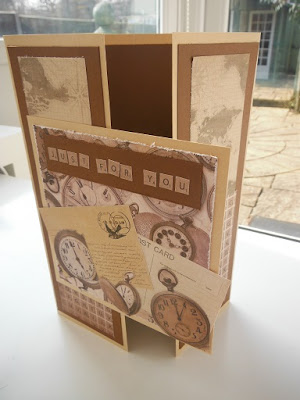
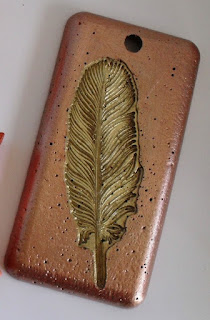
Good Morning Crafters Today we are sharing projects from our new designer who has joined Sue Dix and Lindsay Mason in designing for Personal Impressions Sweet Dixie brand. Kathryn is designing stamps, stencils, MDF products and Dies for us Today we are showcasing her new stamp designs. Hi Peeps, Kathryn here, Just sharing a small selection of cards featuring my new stamp range. I'm so happy to be part of the team. I produce my designs from my photos, sketches and vintage elements. There's quite an eclectic mix in this first set, which I hope you find suitable for all occasions. I try to cram as much on the design plate as possible so you get great value for money but also enough elements on one plate for a project. I've kept my samples quite simple to showcase the main images, so I'm really looking forward to seeing your stunning projects. I really hope you like them and keep your eyes open for future releases. Spring Florals Stash I've

Flowers in Bloom

Image
Good Morning Crafters   Today we have a beautiful project to share with you by Samantha!   Check out the Stockist Locator on the home page of the Personal Impressions website to find a stockist near you of products Samantha has used.     You will need the following to create this project:   Sweet Dixie - Stylised Daisy SDD103 JBS Collection by Studio Light paper pad. Sweet Dixie Lilac Pastel Smooth Card. Craft Stickers pearls Crafty Impressions Iridescent Crystal. Distress Inks, Bundled Sage and Dusty Concord. Stickles Crystal. Step 1   Using a sheet of green paper from the paper pad, die cut the leaves and while still in the die, use as a stencil to add the detail with distress ink Bundled Sage. The same has been done with the flowers with two different papers and the lilac card and Dusty Concord ink for detail. Step 2 Shape all the leaves and flowers on a mat with a ball tool. The smallest flowers have been shaped t

Little Bird House

Image
Good Morning Crafters   Did you all have an enjoyable Easter?   Well today we have Pandy's project to share with you! Very apt with spring being in the air and baby chicks everywhere.     Check out the stockist locator on the home page of the Personal Impressions website for a stockist near you!   You will need the following for this project: Country Love Crafts small Paper Mache Birdhouse Viva Chalk Paint in - White – Dark Green – light green Memento Ink Pads in – Bamboo Leaves - Dandelion Adirondack paint in – Butterscotch – Matching gel and doodle pens Viva Stencil - Grasses and Embellishments Viva Paper Flowers Hot Gun Ranger Liquid Pearls – Lemon Yellow Any odd gems and bling that will match    Step 1 Give the whole bird house a couple of coats of the Viva White paint.     Step 2   Paint the base and just over the corners in the Viva Dark green. Use

Male Gift Bag

Image
Good Morning Crafters    Today Gill's project is for that man in your life.   Everyone has difficulty buying for men and then there is the matter of how it is wrapped. Just because it is a man doesn't mean they shouldn't have a fabulously wrapped gift. Here is an idea of how to make a basic gift bag into a fabulous gift bag. All the products I have used other than the basic gift bag are from Personal Impressions and you can find stockists on their website.   You will need the following for this project:   Vintage Lane Die Cut Block Memento Ink - Paris Dusk (yes this is all I needed)   Step 1   Pop out the background papers and ink the edges. Inking the edges makes the backgrounds 'pop'   Step 2 Stick the background papers to the bag using double sided tape or glue from your basic stash   Step 3 Pop out all the elements of the decoupage and ink the edges of the smaller die cut piece

One for the Gents

Image
Good Morning Crafters   How many of you struggle with creating cards for men?   Today Tracey has a fabulous step by step male card to share.   She has created this project using products from Personal Impressions website.     You will need the following for this project: Sweet Dixie A4 Card Pack – Latte & Chocolate (240 gsm) Kaisercrafts 6 ½ “ Paper Pad – Vintage Timeless Step 1 I took a piece of the Sweet Dixies card ‘Latte’ and created a gatefold card blank by finding the middle mark and folding each side in to the middle up to the mark,  You could use a bone folder to get a nice neat crease line.     Step 2 Now measure each flap of the gatefold and they should measure 7.3cm wide, take the Sweet Dixies Card stock ‘Chocolate’ this time, we need to cut 2 panels for the folds, these need to measure 6.8cm wide by 20cm tall. These can now be stuck in place on the front folds. Now for the inside of the card I ha

Viva Decor Video

Image
Good Afternoon Crafters   Today we are sharing the first of the videos that were recorded in February at Viva Décor in Germany.   In this video Linda is showing how to use the fabulous Concrete mix.   This is a very light weight mix which once dry is very light and can be added to mixed media projects.   We hope you enjoy the video!       Thank you for watching! 

New Stencil Designs

Image
Good Morning Crafters   Today we are sharing new stencils which have been designed by Kathryn Halstead a new designer at Personal Impressions under their own brand Sweet Dixie    Kath has created some backgrounds using the new stencils. They have all been simply stencilled through onto plain cardstock with Distress Inks. The last one was used to emboss the card.  Products used: Splash Stencil Distress Inks Tim Holtz Punch Butchers twine     Products used:   Circular Mosaic Stencil Distress inks Clear Gloss heavy gel Tim Holtz Shadow press embossing folder Flower from stash   Products used:   Skeleton Leaves Stencil Distress Inks Die cut layered flower Sentiment stamp from stash     Products used:   Fern Flourish Stenci l  which has been used to emboss Centura Pearl cardstock Stamp and Die cut from stash Sakura gel pen   These are just a couple of the stencils Kathryn has designed, she has al