Posts

Showing posts from April, 2016

Card-io Bird Table

Image
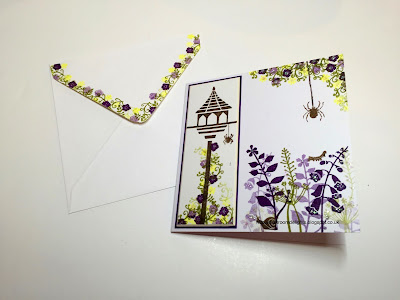
Good Morning Crafters   Today Samantha has created a project using another of the new stamps sets by Card-io.   Check out the Personal Impressions website to see the range of Card-io stamps we stock. On the home page we have the stockist locator enabling you to find a stockist near you.     You will require the following to create this project:   Card-io Collection Backyard Blooms, Veranda View and Pottery Petites. Versafine - vintage sepia, imperial purple, spanish moss and Versa colour canary. Smooth Stamping card, purple card and mount board. Stickles star dust. Glossy Accents.     Step 1   Stamp the bird table and spider onto the mount board with sepia ink.  With the Pottery Petites, stamp the flowers and vines on the leg of the table, with first and second generation stamping. Add glitter glue to the flowers. Draw a line from the spider to the table. Mount the board onto purple card.     Step 2   Stamp the flowers from B

Sweet Dixie Floral Bouquet Part 2

Image
Good Morning Crafters   Today we have part 2 in the series of projects using Sweet Dixie Floral Bouquet by Gill.   Check out the Personal Impressions website all the new Sweet Dixie stamps and dies!     You will need the following for this project: Sweet Dixie Floral Bouquet stamp Sweet Dixie Fantasy Floral Corners Stamp Sweet Dixie Embossing Powder - Pink Sparkle Sweet Dixie Smooth card stock - Rose and Ivory Promarker watercolour pens Memento Ink - Tuxedo Black Step 1 As the stamp was new I like to stamp it several times as the more you use it the more clarity you get. Once I was happy with the image I blasted it with the heat gone to dry the ink completely before I started to colour the image with watercolour pens. I scribbled the pen on a glass cutting board and used my brush and a little water to blend the colours         Step 2 Once the image was coloured I left it to dry and then fussy cut around it   S

Decorated Gift Bag

Image
Good Morning Crafters   Today we have a decorated gift bag project by Mags.   Did you know that Personal Impressions have their own brand called Sweet Dixie? We are adding new ranges to the brand and have many more planned for this year by Sue Dix, Lindsay Mason and Kathryn Halstead. Don't forget to check out the stockist locator on the home page for a stockist near you!     To create this project you will need the following:   Personal Impressions Smooth White Card Sweet Dixie Stamp Set – RTG Flowers Sweet Dixie Die – With Thanks Sweet Dixie Embossing Powder – Black Rainbow Super Sparkle Versamark Ink Pad Distress Ink – Wilted Violet, Dusty Concord, Shaded Lilac Scrap of purple card Kraft Gift Bag Butterfly punch Double Sided Tape     Step 1   Cut a piece of smooth white card to fit the front of the gift bag.  Do a colour wash onto the white card using distress ink and water.  Simply apply some distress ink to a craft mat

Card-io Scarecrow

Image
Good Morning Crafters   Today we are sharing a project by Samantha.   She has used one of the new stamp sets by Wendy at Card-io.   Check out the Personal Impressions website to see the new Card-io sets of stamps.     You will require the following to create this project:   Card-io Collection Backyard Blooms and Pleasant Pastures, Distress Inks, Peeled Paint, Peacock Feathers, Picked Raspberry and Mustard seed. Watercolour card, black card. Ranger - Archival Ink, jet black, Stickles star dust. Glossy Accents.   Step 1   Add distress inks onto a matt and spray with plenty of water and wipe watercolour card thought to make the background scene. Leave to dry. Step 2 Use a Waterproof Ink to stamp your scene. Started with the Branch and scarecrow, adding the bird and snail to his/her arms.     Step 3   Continue to build the scene with the web and flowers. With the flowers, stamp twice without re inking to get a soft lo

Teapot Tea Caddy

Image
Good Morning Crafters   We have a great idea on how to use an MDF teapot today by Louise.   The teapot is part of Studio Light products and check out the Personal Impressions website for more great products from Studio Light.     For this project you will require the following:   Viva Decor Vintage Chalky paints Studio Light, Janneke Brinkman MDF Teapot, papers and decoupage kit Extras: white and green card scraps, sequins     Cover the teapot sides with chosen paper. Trim excess and sand edges. Once dry, assemble all the pieces.   Using Weib (white) Vintage Chalky paint, cover all exposed MDF. Dry brush over the edges to blend with the paper.       Using the paper scraps, stick randomly to a piece of card. Cut to fit the smaller sides and inside of box part, sticking in place.   Begin decorating the front of your teapot using various paper elements in the kit. You will not be stuck for choice as there are two pages of e

Sweet Dixie Floral Bouquet Part 1

Image
Good Morning Crafters   We have a step by step project to share with you by Gill. This is part one of 3 designs using the floral bouquet by Sweet Dixie.   She has used one of the new Sweet Dixie Stamps designed by Sue Dix and can be found on the Personal Impressions website:     You will need the following for this project: Sweet Dixie smooth card in white Sweet Dixie Floral bouquet stamp Memento ink - Tuxedo black Spare scrap of black card Little gems 6x6 Square Card blank   Step 1 Cut a piece of white card into a square 1/2 cm smaller than the card blank Ink the flower part of the stamp and stamp in the bottom left hand corner of the square. Stamp another corner on a scrap piece of card and cut out. This will mask to cover the original stamp On the square card mask the original image and stamp again above and to the right hand side   Step 2   The card layer will look like this when you have finished stam

Flower and Bottle Canvas

Image
Good Morning Crafters   We have a step by step canvas tutorial by Pandy today.   She has used part of the new sets designed by Kathryn Halstead for the Sweet Dixie range.   Check out the Personal Impressions website for all the new products we have in the Sweet Dixie range.       You will need the following the create this project:   Small canvas – approx. 12cm x 17cm Viva Chalk Paint in white Sweet Dixie clear stamp – Daisy and Bottles (SDCSA6036) Memento Inks in – Tuxedo Black – Bamboo Leaves – Lilac Posies – Grape Jelly Versamark ink pad Sweet Dixie embossing powder Antique Green (SDEP707) Little dragonfly or butterfly embellishments Hot glue gun Small pieces of packing to raise the bottles Stickles Stardust glitter glue     Step 1   Turn the canvas back to front and give a thorough coating with the viva white paint.     Step 2   Stamp the bottles and the label with Versamark ink and use the embossing powder.  The