Posts

Showing posts from January, 2016

Marianne Birdhouse Card

Image
Good Morning Crafters   Happy Friday to you All!   Today we have a new project to share from Samantha   Products used are available on Personal Impressions Website  For this project you will need the following!   Birdhouse, Marianne Design Collectables. COL1308. Design Folders Extra - DF3413. My Colours card stock, Muslin. Deep Pink ribbon. Viva Inka Gold. 4mm gold pearls. Victorian Velvet and Bundled Sage Distress Ink. Stickles, Star dust. String.     Step 1   Die cut the birdhouse from Muslin card stock. Stamp the birdhouse onto the die cut.       Step 2 Use the Embossing folder on the Muslin card stock and die cut the hearts twice. Ink the edges with Victorian Velvet Distress Ink. Colour in the birdhouse and add Crystals. Add Inka gold to die cut hearts and birdhouse.    Step 3 Tape the two pieces of ribbon to top and bottom of car...

Mini Scrapbook

Image
Good Morning Crafters   Pandy sharing with us today a mini scrapbook made using cards.   Products used on this project can be found on the Personal Impressions website.   We have a Stockist Locator on the home page to find a stockist near you!   You will need the following:     4 Card Blanks Marianne Designs French Roses Paper Crystal Stickers Ruler and Pencil Ribbons/Fibres/Twine/Beads     Fold the card blanks down their score line and mark the centre of the spine.     Measure 1½” along from the centre mark along the spine – and ½” in from it.  Draw in the side boxes and cut along the pencil lines leaving the centre hinge.  Do this on all of the card blanks.     Keep one spine as it is for the middle of the book – score one spine a tiny bit out each side of the line so it will sit snuggly round the inner page.  Score another spine a little wider...

Altered Wine Bottle

Image
Good Morning Crafters   Today we have an altered art project for you by Gill.   Products used you can find on the Personal Impressions website.   Personal Impressions  website has a stockist locator which enables you to find a stockist near you.   To create this project you will need the following       A clean empty wine bottle White Gesso Tim Holtz Tissue Wrap Ranger Distress Spray Stain - Hickory Smoke Inca stamp -Swallowtail Butterfly Black acrylic paint Black Memento ink Sweet Dixie Die - Stylised Daisy Scrap card in white, black and grey. PVA Glue Crystal Sticker gems Step 1     Cover the bottle in two coats of white Gesso When dry cover in PVA glue and roughly stick the tissue paper covering the whole bottle apart from the neck. Ensure you have plenty of texture to the tissue paper. Lightly spray the distressing ink for a little more texture. Paint th...

Love, Cherish, Hold

Image
Good Morning Crafters   We are super excited today as we are sharing another of our new design team members first project with you. Lou Sims, has been crafting for a number of years and is a sample maker for a number of companies so we are excited that she has joined our team.   Products Louise has used can be found on the Personal Impressions website.   For this project you will need the following supplies:   Personal Impressions Premier Quality Smooth White Card Picked Raspberry distress ink Spun Sugar distress ink Pumice Stone distress ink Jet Black Archival Ink Cardio Collection Nuit Paris stamp set Dali ART The Moment - Butterfly Swirl stamp set. Lace from own stash Before I begin and explain how I created my card, I thought I might share the tip of removing ink from a stamp; generation stamping technique. On a scrap piece of paper, I stamp an image and then restamp and restamp writing beside each. This way I know how many times I nee...

Photo Album

Image
Good Morning Crafters   A new project to share with you by Pandy!   Check out Personal Impressions website on the products Pandy has used.   On our home page we have stockist locator for a stockist near you.   For this project you will need the following   1 x 12” x12” sheet of My colours cardstock – Tropical Sea Double sided tape BoBunny 6” pad Zip-a-dee-doodle Ribbon for a tie     Step 1   Score the card as follows - 6” – turn the card and score across the line at 3” – 6” – 9”.   Cut along the single 6” centre score line between the 3” score line and the 9” score line.     Step 2   Crease all the score lines well.  Put double sided tape on the back of 2 of the centre panels that face each other - either side of the long score line.      Step 3   Fold the card along the single centre fold line – take the first section and the last se...

Floral Card

Image
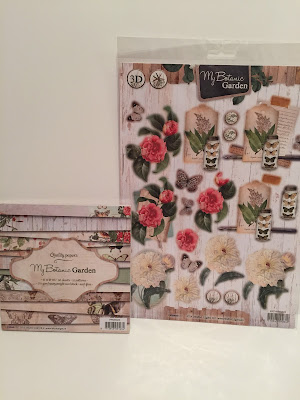
Good Morning Crafters   Well this week sure has gone in the blink of an eye.   Today we are sharing Samantha's project with you!   Products used are available on Personal Impressions Website You will need the following:   My Botanic Garden Pack, Studio Light. PPMBG20. 3D die cut sheet from the same collection, EasyMBG 423. Craft UK LTD C6 white card, 250gsm. Crafty impressions, Crystal Stickers, Iridescent. pink ribbon. Viva Inka Gold. Stickles, Star dust.       Push out the pink flower die cuts, shape with a ball tool and mat. Layer up with 3D glue.      Cut a decorative page from the paper pad to fit the C6 card Join the page so the decorative sides are on both side. Hide the join with the ribbon and glue to the back of the paper.   Add the Inka gold to the edges of card. Glue on the 3D flower. Tie a bow with matching ribbon.     ...

Decorative Frame using Studio Light

Image
Good Morning Crafters   Today we are sharing Tracey's first design team step by step project with you. If you wish to know a little bit more about Tracey and her crafting check out "meet the team" page.   She has used products from Personal Impressions website.   Items Used: Deco Patch Square Frame – REF: CD695o My Botanic Garden Quality Papers 6”x6” Pad by Studio Light Decopatch Sparkling Glue Craft Stickers Adhesive backed sparkly gems by Eleganza Scissors, craft glue and double sided sticky tape, paint brush.     Step 1 Select 4-5 sheets of pattern paper from the My Botanic Garden paper pad and tear into small pieces approx. 2.5cm x 2.5cm roughly. Pour some of the sparkly Decopatch glue into a bowl ready. Make sure you have a covered surface as the next step is quite messy.     Step 2 Take the small pieces of patterned paper and start to fix them to the Decopatch ...