Botanical Canvas
Good Morning Crafters
Today we have a beautiful step by step by Tracey.
She has used products from the Personal Impressions website.
Check out the home page for a stockist near you!
My Botanic Garden
Quality Papers 6”x6” Pad by Studio Light
Eleganza Adhesive backed sparkly gems
Tim Holtz – Distress Ink
Ranger – Spritz bottle
Hessian Ribbon
Canvas A5 size
Ink Duster
Paper flowers
Crackle Accents
Step one is to get all the lovely elements
together ready for the project and here they are.
We start with distressing the blank canvas
by first dusting the corners and edges with the ink, then I have rubbed the pad
across the surface for added colour and then sprayed the canvas with the spritz
spray to add even more texture to the canvas as a base before we begin
construction.
The next stage is to take a sheet from the
‘My Botanic Garden’ pad, I have used a sheet with butterflies in the corners as
these will be used as our embellishments later on. I have torn the left bottom
corner off and dusted the edges with the distress ink to add a more vintage
feel to the edges once I have done this I glue it in place on the bottom left
corner.
Now I have taken a strip of the Hessian
ribbon and rubbed the Distress ink pad over it to give it colour and definition
and glued this in place on an angle on the top right corner of the canvas.
I have now gone back to the remaining
corner of the backing paper and roughly ripped the two butterflies out,
distress them by rubbing the ink pad on the edges and then glued in place using
strong PVA glue.
Next I have taken the green floral ribbon
and using double sided sticky tape I have glued a strip down the right side at
the bottom and a smaller piece in the top left corner.
We are now starting to build the flower
elements into the canvas design and I started with some larger paper flowers
which I have spiralled the wire around my embossing tool to create a lovely
visual effect. I have done this to 2 roses and glued into the top right order
on the hessian.
We now use the smaller paper petal flowers
and glue in the corners of the butterfly paper corner and I have added the
Eleganza self-adhesive gems on to the centre of the flowers.
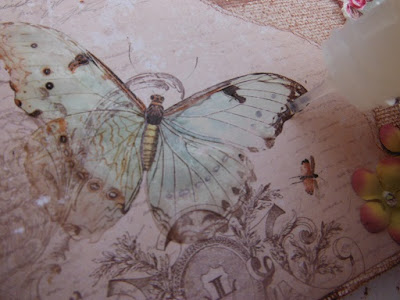
Almost finished but I wanted to add some
texture to the large butterfly in the bottom left corner so I have applied
Crackle Accents on to the whole of the butterfly. This will take a couple of
hours to dry and create the crackle effect but it’s great when it’s dry.
The final step whilst the crackle accents
is drying I have used some more self-adhesive gems and applied them into the
corners of the canvas.
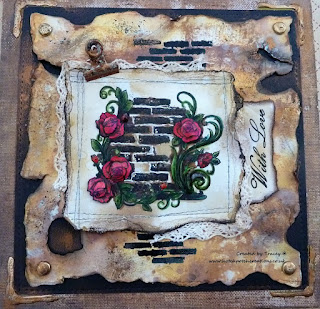
We are all finished and have a very
beautiful mini Canvas art piece.
Many thanks for visiting today!


Wow absolutely fabulous. X
ReplyDelete