Posts

Showing posts with the label Distress Inks

New Home

Image
Good Morning Crafters   We have a new step by step project for you by Louise.   She has created a new home card using Card-io stamps.     Check out the Personal Impressions website to see the new range of Card-io stamps.   You will need the following to create this project:   Card-io Nuits Paris stamp collection Distress inks: Peeled Paint, Pumice Stone, Picked Raspberry, Evergreen Bough, Broken China and Scattered Straw Black Archival Ink     Step 1 Take a piece of water colour card and make an A6 card blank. Mask the card front using tape about 3/4 the way down.     Step 2 Using the Archival Ink stamp the row of houses so that it goes over one edge.   Step 3   Mask the houses and stamp the trees to create a background.     Step 4   Colour in the houses, trees and add some sky using your distress inks. Remove one of the pieces of tape and dra...

Bird and Blossom

Image
Good Morning Crafters   Today we have Samantha sharing a step by step project using Sweet Dixie Stamps designed by Kathryn Halstead a new designer for Personal Impressions.   Check out the Personal Impressions website to see more stamps designed by Kathryn.     To create this project you will need the following:   Sweet Dixie Blossom stamps, SDCSA6060, by Kath Halstead. Studio Light, Shabby Chic paper pad. Oaktree adhesive pearls. Deep Pink organza ribbon. Distress Ink Pads, Vintage Photo,Fossilised Amber, Victorian Velvet, Picked Raspberry and Peeled Paint. Ranger Stickles star dust. Step 1   Stamp the bird and blossom onto fine watercolour card with a permanent, waterproof ink, Archival.   Step 2   Colour with Distress inks, onto a matt and water coloured. Then fussy cut out the bird on branch and blossom.     Step 3   The background paper is from the studio light pa...

Faux Leather Cat Frame

Image
Good Morning Crafters   We have something today for all you cat lovers out there.   A number of our design team members are cat lovers including me!   Samantha shares her step by step with you and she has used products from the Personal Impressions website.   Products used for this project are; Marianne Design folder DF3411(paw prints) Marianne Design Collectables COL1344 ( cats) Studio Light - My Botanic Garden paper pad for butterflies. Crafty Impressions Cream chiffon flowers. Distress inks -rusty hinge, vintage photo and walnut stain. Distress stain - vintage stain for wood. Viva Inka Gold. Ranger, glossy accents and stickles star dust. For faux leather - Kraft card, Glycerine 1;4 water, spray gloss varnish. Extras   recycled embellishments tray, wooden hearts, paw, flower bling, bird cage.   Step 1   Spray the Kraft card both sides with the Glycerine mixed with water 1;4 parts,  Take...

Decorate Bottle with Graphic 45

Image
Good Morning Crafters   Today we are sharing Samantha's fabulously decorated wine bottle.   She has used Graphic 45 Time to Flourish.   We have a wide selection of Graphic 45 on our website including the 2 new range's Gilded Lily and Rare Oddities.  To find a stockist near you we have a stockist locator on the home page.   We also have a new website called Craftexcess why not check this out too for your crafty needs.     What a fabulous way to recycle those wine bottles!   Thank you for visiting! 

Tattoo Bird

Image
Good Morning   Lindsay Mason's stamps are very popular with our sample makers.   Today we are sharing Kim's tutorial on 3 ways in which to use the Tattoo Bird.   All products can be found on the Personal Impressions website.   To find a stockist near you, visit the home page for the stockist locator.   Thank you for visiting Today!   

Graphic 45 Shabby Chic Card

Image
Good Morning   Today we have Samantha's beautiful Shabby Chic card to share with you.   She has used Graphic 45 Time to Flourish papers from our website .   On our home page you will find a stockist locator which enables you to find a stockist near you.     Here is the card finished.   Thank you for visiting!   

Studio Light desk tidy project - Fathers Day

Image
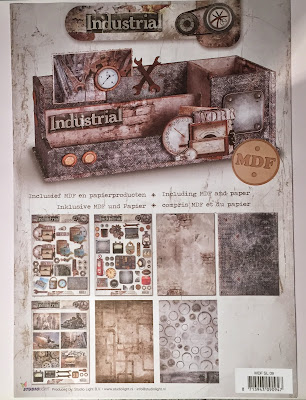
We sent a member of our sample making team the  New Studio Light 'Industrial' Desk Tidy MDF kit. The kit comes with easy to assemble MDF Desk Tidy, 4 double sided A4 patterned papers, a sheet of die cut découpage embellishments, a sheet of vintage elements and vintage photographs. Here is what Kathryn created... Hi Peeps Here's my Project... Perfect for fathers day  From the kit I managed to make the tidy and a fathers day card and I have plenty of bits left over for at least a couple of tags and card. The box was very easy to assemble, there are instructions on the back of the packaging if you need help though. I assembled the box and painted the edges with burnt umber acrylic paint then I added paper to all the panels. I then added some of the découpage and elements sanded a bit of the edges and added a little Inka Gold paint to the edges to distress further. Once dry I coated with Mod Podge to seal. For...