Posts

Showing posts from September, 2015

Rusty Fun with Viva Decor

Image
Hi Peeps  Kath here with a quick project featuring the Viva Decor Rusty paint set.   You may have seen the lovely Anke on The Craft Channel demo'ing this product...  I had to have a go... Products used from the Personal Impressions website: Viva Decor Rusty Paint kit (Available on the Craft Channel - Trade at Personal Impressions) MDF shape Tim Holtz flourish stamp Ranger Tarnished Gold Embossing Powder A few bits from my stash   Coat the shape with a good base coat of Rusty Paper paint (You could use gesso if your shape is very porous) let it dry Take a little of  the Paint and stipple it over the shape, then repeat with the Patina whilst the paint is still wet, build up in layers until you're happy, I did two coats of each. don't forget your sides! Once it's completely dry...... take a stamp ( thicker patterns work best as the surface is bumpy) Using an embossing pad stamp over your project pressing firmly (Us...
Doggy Days

Image
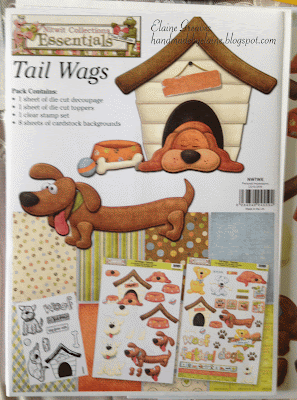
Good Morning   Today we have Elaine sharing her project with you!   Products used are from Craftexcess   Nit wit collections - Tail wags Tokens - metal doggy charms Adhesives and foam pads. Step 1   With so many elements to this kit, one of the projects I wanted to make was a 8x8 inch scrapbook page of my dogs Bud & Stella...yes they are named after larger!   Step 2   To create an embellishment for my page I have used Tim Holtz mini paper rosettes die from my stash. Step 3   Once you have cut out the rosette fold the paper back so you get the accordion effect. Step 4   Glue the ends together and push the centre down and adhere the centre of the rosette, I have used a paw print from the kit. Step 5   and voila you have a rosette! Step 6   When choosing the papers a good tip is to try and use colours which will enhan...

TagTastic ...

Image
Hi Peeps Kath here with finished tags samples from the YouTube tutorial we posted ....   It's posted below if you haven't seen it.   Just showing what you can create with the Techniques All Goodies used are Tim Holtz except some ribbons from my stash Embossing with Stencils and sanded back, before colouring with DI's   Using Glue n Seal and adding Distress Glitter    Using Rock Candy Distress Paint through stencil Using Distress Glaze through the stencil to create a resist before adding distress inks Don't forget to check out our Mod Podge blog candy Thanks for looking  Kathryn x

Flower Delight

Image
Good Morning Crafters   October has arrived and this year is going far to quickly!   Today we are sharing Mag's step by step.   She has used beautiful papers and decoupage booklet by Studio Light Visit the Personal Impressions website to see the full range.   Products Mags has used:   Studio Light Floral Delight 3D Die Cut Block Studio Light Flower Delight paper pad   Step 1   Take a 14 by 14 cm card blank and fold the front of the card blank in half.  Adhere a 14 x 14 cm piece of card to the bottom half of the folded piece.  This will create an easel card blank. Step 2 Using elements from the 3D Die Cut Block create your card topper using some pink card to matt the topper onto.   Step 3   Create the stopper for the easel card using matching papers from the Flower Delight paper pad.     Step 4 Adhere the topper to the easel card blank using do...

Vintage Tag

Image
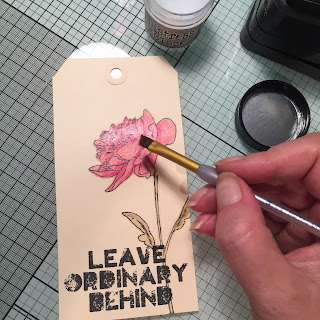
Good Morning Crafters   Here is a quick Tag............. Using Tim Holtz goodies These tags make a perfect alternative greetings card or  add a  special finish to a gift.  Use them as bookmarks or swap with friends.... You will need   A Large Manilla Tag Tim Holtz Distress Inks & Sprays Tim Holtz Micro Glaze Tim Holtz Layering Stencils - Speckles & Flourish Idea-ology Trinkets of your choice Ribbon Stamp your chosen image  and colour with Distress Inks Cover with Micro Glaze  to mask the images.  Colour over the card with Distress Inks,  blending in as you go.  Edge with a dark colour for that vintage look  Lay Over your stencil and spritz with Distress Spray Dry with heat tool  Place Splatter stencil over and lightly spritz. Dry with Heat tool Give the Flower head a thin coat of  Glossy Accents if you wish to add a bit of dimension....

Little Darling's A Sled Full

Image
Good Morning Crafters We would like to introduce you to Gill Brannan who has joined the sample making team.   Hi my name is Gill and I am a full time working wife, mum and nanna.   I have always loved making things as far back as I can remember but became serious about it when my children were little. As with most of us crafters I started with knitting, cross stitching and sewing.  Once I found card making and paper crafting I was hooked and filled my house with lovely crafty goodies ever since.  Luckily I have a very patient husband who eve helped me create my craft corner in the living room so we can still sit in the same room as each other.   I have recently reinstate by blog Dixie Designs by Gill and am getting used to keeping it up to date so feel free to pop over, have a look and leave a comment.   I am so pleased to have been picked for Linda's design team it is a real honour as I have followed her for a long time.  This i...

Home Sweet Home

Image
Good Morning Crafters   A project today by Sandra who has used the gorgeous Graphic 45 Home Sweet Home papers and tags.   How many of you out there are Graphic 45 fans, I know our ladies love working with these papers.   Personal Impressions website has a wide variety of their papers and accessories. Check out the stockist locator for a stockist near you.     Spend a little time Fussy cutting out from the patterned papers     Pop out the tags and Chipboard pieces As you can see here I have used A sticker in the middle of the chipboard piece to allow for a black boarder in the middle   At the back of the pad there are templates to cut out to use too.   Use your stickers and tags to create Tabs   Attach the tags together with ribbons matching the papers, here I have used gingham ribbon.    Thank you for visiting today!

Craftexcess Robin Template Scrapbook Page

Image
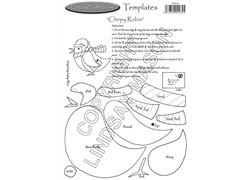
Good Morning Crafters   A real quick and easy tutorial this morning by our Pandy.   She has used the Robin Template from our Craftexcess website.   Materials used Personal Impressions Chirpy Robin template one sheet of 12” x 12” scrapbook paper odd scraps of left overs     Step 1 I love a good template - you can do so much with it. I cut all my bits and bobs out from oddments of paper in my scrap box.  The brown body and wing is actually a very thin wood paper – his tummy is a wonderful swirly gold foiled and red piece – and the hat and scarf are felt.     Step 2   I assembled my robin then set him over a strip of gold mesh to one side of my paper Now all I need to do is find a good photograph!       Just a great idea for all you scrapbook lovers out there!   Thank you for visiting!

Sweet Dixie Christmas Charms

Image
Good Morning Crafters   Today we are sharing Pandy's simple and easy tutorial with you.   She has created cute charms using Sweet Dixie Stitched Christmas Stamps.   You can view the full range of Sweet Dixie Stamps on the Personal Impressions Website.   You will need Sweet Dixie Stitched Christmas Shrink Plastic StazOn Ink Pad Heat Tool   Step 1.   Stamp the images with the StazOn and leave to dry – you can’t heat set it remember!     Step 2   Colour the images if you wish – I have used my Inktense pencils.     Step 3   Cut out the shape just outside the stamped line. Hold the charm with a wooden handled tool and use your heat gun to shrink.     Step 4   Make a ‘raggie’ bow by tying together some ribbon, string, wire and fibres. Glue the charm onto the centre of the knot with a heat gun.   Step 5 ...